Fascia Stretching for Seniors – 3 Best Stretches
Welcome to the ultimate guide on fascia stretching for seniors! If you’re a senior or a caregiver, you’re in the right place.
Fascia stretching isn’t just a buzzword; it’s a game-changer for your flexibility, pain levels, and overall quality of life. Let’s start!

What is Fascia?
Fascia is a web-like network of connective tissues that surrounds your muscles, organs, and bones. Think of it as the body’s internal cling wrap. For seniors, maintaining healthy fascia is crucial for mobility and reducing pain.

Why is Fascia Stretching Important for Seniors?
As we age, our bodies become less flexible. That means fascia across our body is influenced by aging also. With regular stretching your fascia you can:
Types of Fascia Stretching
Dynamic Stretching
Involves movement and is excellent for warming up.
Static Stretching
Involves holding a stretch, beneficial for cooling down.
Foam Rolling
Uses a foam roller to apply pressure and stretch the fascia.
Benefits of Fascia Stretching for Seniors
Fascia stretching is like a magic wand for seniors. It offers pain relief, enhanced mobility, and improved posture. Imagine bending to tie your shoelaces or reaching for a high shelf without wincing in pain. That’s the power of fascia stretching.
How to Start Fascia Stretching
Before you jump into a stretching routine, consult your healthcare provider, especially if you have existing health conditions. Start slow and listen to your body. The best time to stretch is when your muscles are warm, perhaps after a light walk.
3 Best Fascia Stretching for Seniors
Downward Dog
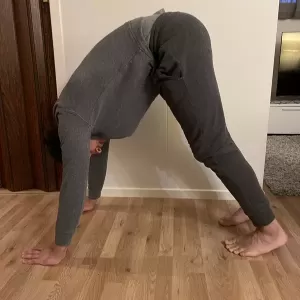
- Start on All Fours: Position yourself on your hands and knees on a yoga mat. Make sure your wrists are directly under your shoulders and your knees are under your hips.
- Spread Your Fingers: Fan out your fingers wide and press your palms firmly into the mat.
- Tuck Your Toes: Curl your toes under so that the balls of your feet are touching the mat.
- Lift Your Hips: Exhale and lift your hips towards the ceiling, straightening your legs and arms as you go.
- Form an Inverted ‘V’: Your body should form an inverted ‘V’ shape. Keep your back straight and your head between your arms.
- Adjust Your Feet: Walk your feet towards your hands if needed, but keep them hip-width apart. Your heels should be as flat as possible on the mat.
- Engage Your Core: Tighten your abdominal muscles to support your back.
- Hold and Breathe: Hold the pose for 5-10 breaths, inhaling and exhaling deeply.
- Release: To come out of the pose, lower your hips back to the starting position on all fours.
Lower Body Rotation
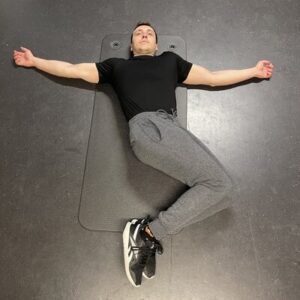
- Start Position: Lie flat on your back on a comfortable surface, such as a yoga mat or carpet. Keep your arms extended out to the sides, palms facing down for stability.
- Knees Up: Bend your knees and place your feet flat on the floor, hip-width apart.
- Ankles Together: Bring your ankles together so they are touching.
- Knees Together: Make sure your knees are also touching each other.
- Engage Core: Tighten your abdominal muscles to stabilize your spine.
- Rotate to One Side: Keeping your knees and ankles together, gently lower both legs to one side. Aim to get your knees as close to the floor as possible without lifting your upper back or shoulders.
- Hold and Breathe: Hold the position for 5-10 seconds, breathing deeply. You should feel a stretch in your lower back and possibly along the side of your body.
- Return to Center: Slowly lift your knees back to the starting position.
- Rotate to the Other Side: Repeat the rotation, this time lowering your knees to the opposite side.
- Hold and Breathe: Again, hold for 5-10 seconds, focusing on your breath and the stretch in your lower back.
- Return to Center: Bring your knees back to the starting position.
- Rest: Straighten your legs and take a few deep breaths before repeating the exercise.
Child Pose

- Start on All Fours: Begin by positioning yourself on your hands and knees on a yoga mat or comfortable surface. Your wrists should be under your shoulders, and your knees under your hips.
- Spread Knees: Move your knees apart while keeping your big toes touching.
- Sit Back: Slowly sit your hips back towards your heels. If your hips don’t reach your heels, that’s okay—just go as far as is comfortable.
- Extend Arms: Stretch your arms out in front of you, palms facing down on the mat.
- Lower Torso: Gently lower your torso between your thighs, aiming to bring your forehead to the mat.
- Relax Shoulders: Allow your shoulders to relax and soften, creating space between your shoulder blades.
- Deep Breaths: Take deep, calming breaths, focusing on expanding your ribcage and back as you inhale, and relaxing deeper into the pose as you exhale.
- Hold the Pose: Maintain this position for 30 seconds to a few minutes, depending on your comfort level.
- Release: To come out of the pose, use your hands to gently push yourself back up to a seated position.
- Rest: Sit back on your heels for a few moments to enjoy the relaxation and benefits of the stretch.
Common Mistakes and How to Avoid Them
Avoid these mistakes for a safe stretching experience:
- Overstretching: Less is more. Don’t push too hard.
- Incorrect Form: Bad form can lead to injuries.
- Not Warming Up: Always warm up before stretching.