How to Fix Hunchback Posture With Step-by-Step Guide
With the advancement of technology, our habits have also changed.
One of the apparent changes is that we sit longer and longer.
Whether we are sitting at work in front of the computer or at home watching tv, we sit a lot.
Unfortunately, that reflects in our posture.
Hunchback posture is one of the common occurrences in people and is usually associated with forward head posture or rounded shoulders.
In this article, I will show you how to fix hunchback posture with an effective exercise routine you can do even at home.
Let’s see the theory behind hunchback posture first, and afterward, you can follow the step-by-step guide to correct hunchback posture.
What is Hunchback Posture?
Hunchback posture, or Thoracic Kyphosis, is an excessive forward curvature of thoracal spine.
The upper back gets a C-shaped side look.
Slight curvature in thoracic spine is a common occurrence because spine help absorbs pressure, and therefore curves are created.
Curves are also created in cervical and lumbar spine (cervical and lumbar lordosis), but I will cover these topics in separate articles.
Before we move on to common causes for hunchback posture, I want you to understand that a slight curvature of the thoracic spine is a completely normal phenomenon, while hunchback posture refers to a more pronounced thoracic curvature.
Extreme cases of thoracic kyphosis are often called hyperkyphosis.
What Causes Hunchback Posture?
There are several ways to obtain a hunchback posture.
Here you can see one of the 6 most common causes for hunchback posture:
1. Poor posture in childhood
Excessive strain on the back, such as carrying heavy school backpacks can affect the formation of the hunchback posture.
Over time, this posture may become more pronounced.
2. Poor posture in adulthood
Slouching while seating is one of the common causes of postural kyphosis or hunchback posture.
3. Too much sitting
Our body don’t like to sit as much as we sit today.
The average adult American sits 6.5 hours a day, which is a huge number.
Muscles in the back (between the shoulder blades) become weaker, while the muscles in the front become tight over time when sitting a lot.
4. Inadequate training in the gym
Excessive training of strength exercises for the pectoral muscles while neglecting the muscles between the shoulder blades can result in a hunchback posture.
5. Genetics
In rare cases, Scheuermann’s kyphosis occurs. It happens structural changes in the growth of spinal vertebrae which lead to kyphosis. It occurs in children, more often in males.
Congenital kyphosis refers to postural deformity which occurs before birth.
6. Aging
Over time, our joints become less elastic and more mobile, which will affect joints in the spine.
As a result, the thoracic curve becomes a little more pronounced due to these degenerative processes in our body.
And here are also some of factors that contribute hunchback posture:
- Sleeping on your side or on your back with too many pillows
- Exaggerated abs training (crunching)
- Low Confidence
How to Tell if You Have Hunchback Posture?
One of the simplest tests for checking if you have a hunchback posture is to:
- Stand with your back against a wall and assume your habitual standing position.
- Then, someone can take a picture of you or analyze your posture in the back from the side
- If your posture is similar to the one in the picture, you have a hunchback posture (see the picture below)
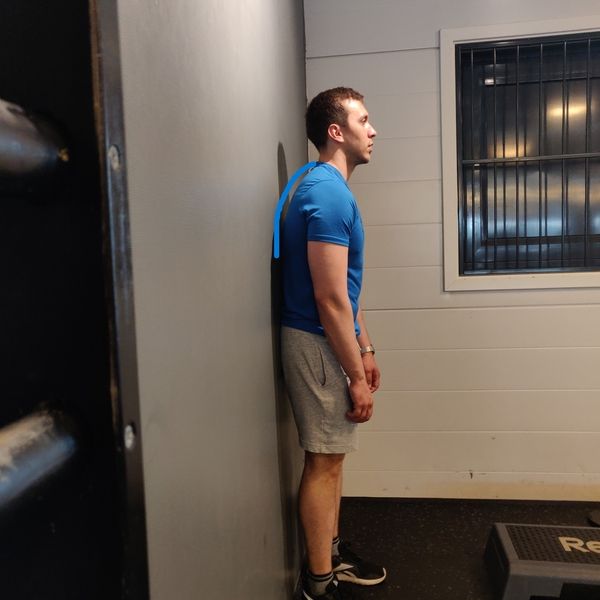
Whether you have less or more emphasized curvature in your back, these exercises will help you correct your hunchback posture.
How to Fix Hunchback Posture?
Here is a step-by-step guide for correcting hunchback posture. It consist of:
- Myofascial Release with Foam Roller
- Mobility Exercises
- Strengthening Exercises
- Stretching Exercises
Repeat exercises in the same order as presented here to get the best results.
1. Myofascial Release with Foam Roller
Releasing muscles that are tight and contribute to hunchback posture is the first thing you need to do.
That should make it a bit easier for you to do stretching and strengthening exercises afterwards.
Latissimus Dorsi Muscle Release
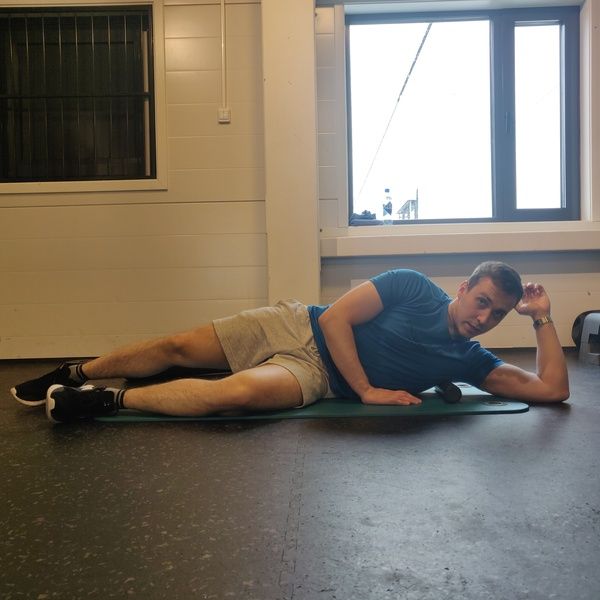
- Lay down on one side
- Place foam roller on the upper part of your latissimus dorsi muscle
- Press down gently with your body and hold the pressure for 10-15s.
- Then move foam roller a bit down or up and repeat do the same
- Release 3-5 spots
Rectus Abdominis Muscle Release
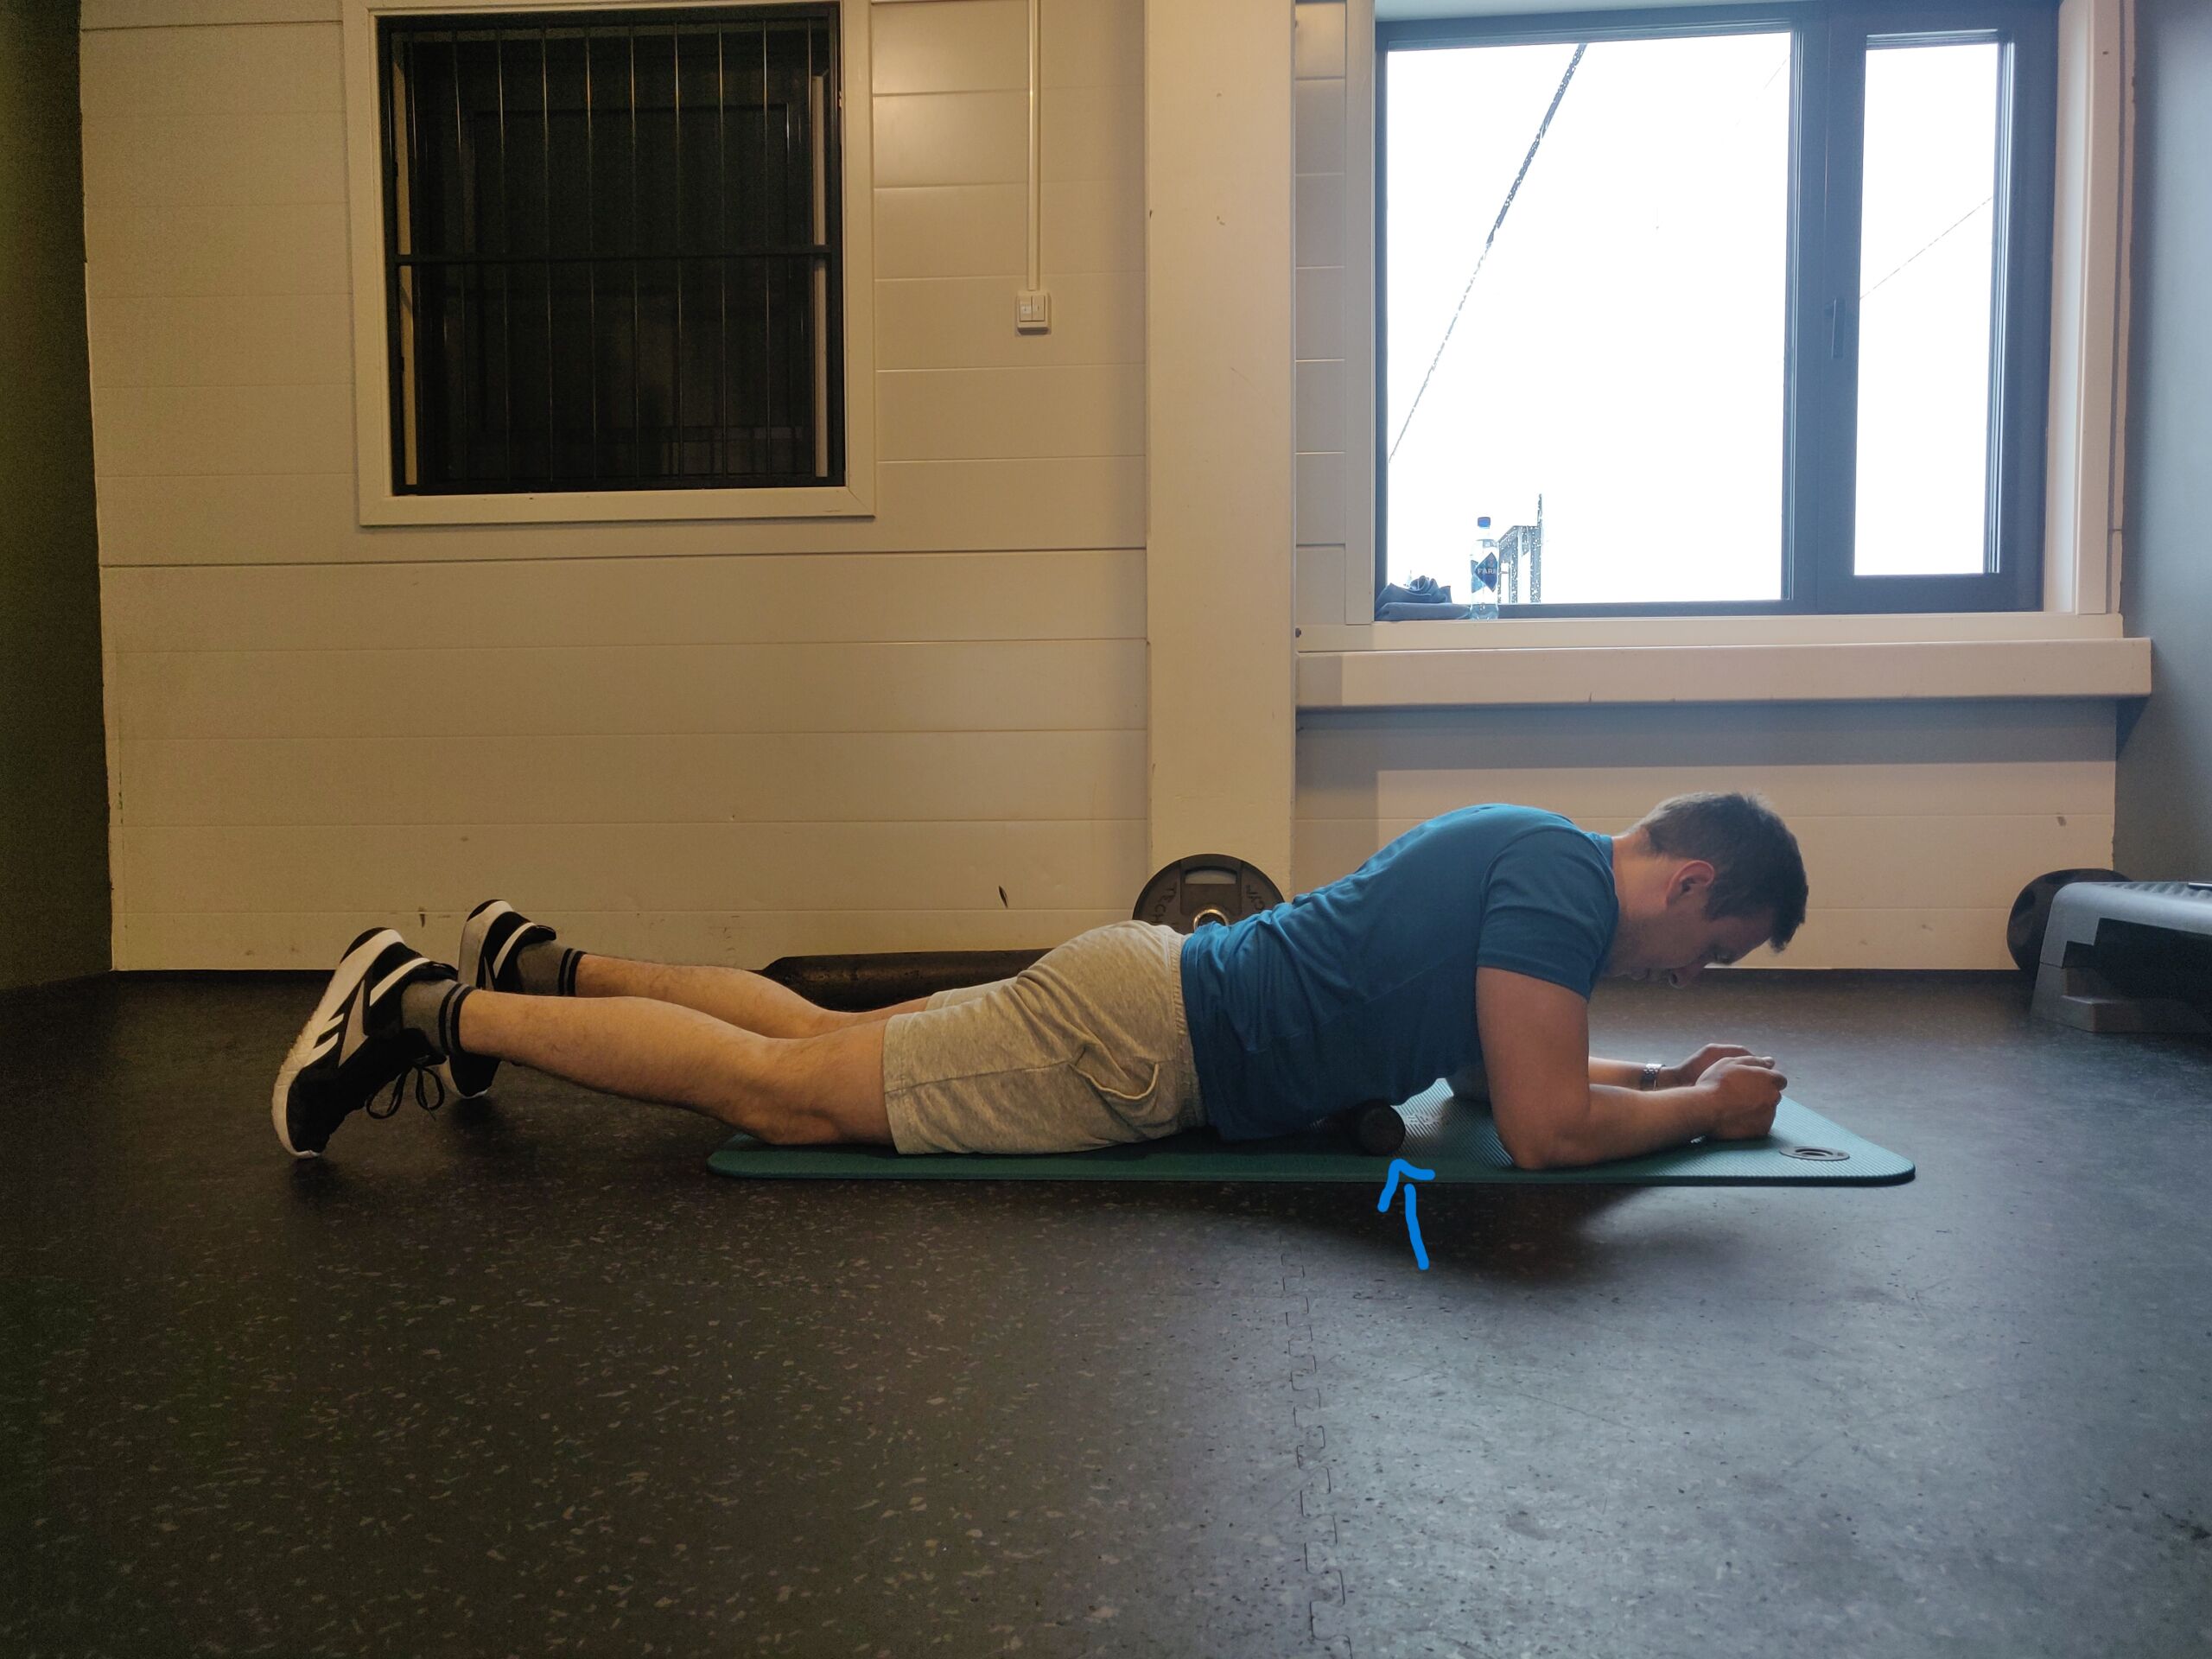
Spot 1 (upper part, just beneath the chest)
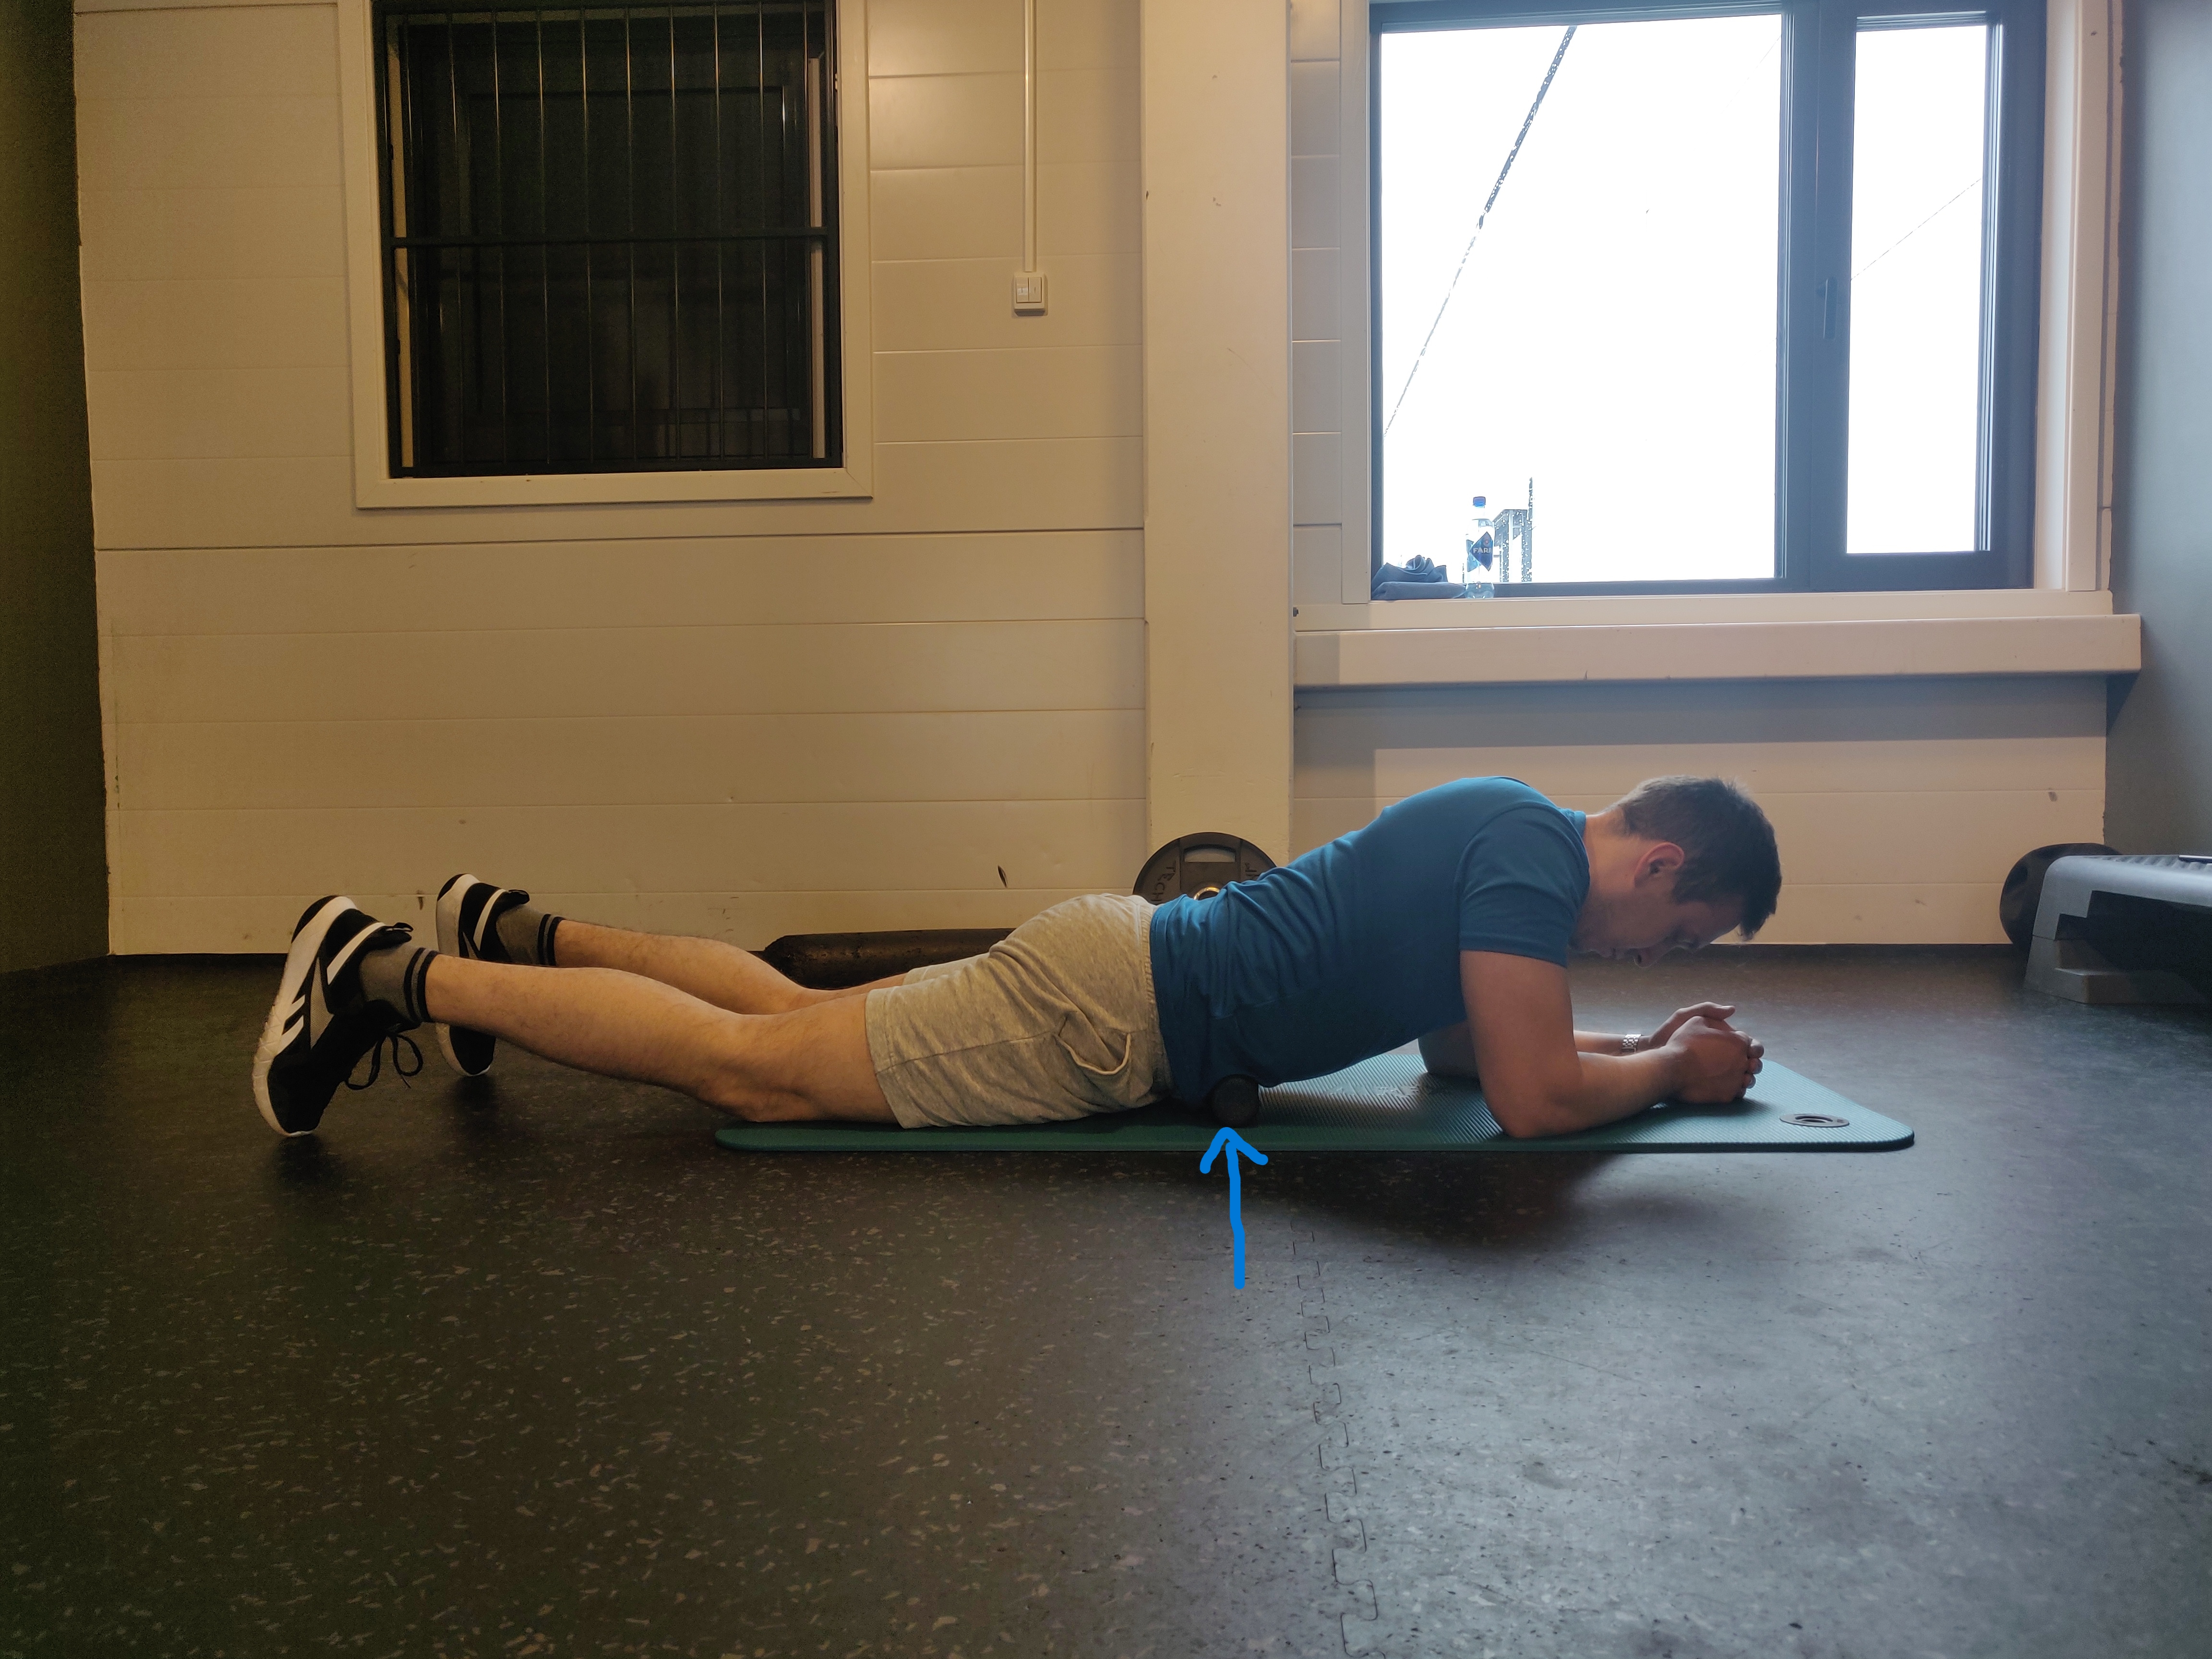
Spot 2 (lower part, just beneath the belly button)
- Lay down on your stomach
- Place the foam roller as described on the pictures above
- Press down gently with your body and hold the pressure for 30s
- Release two times both spots as on picture
Chest Muscles Release
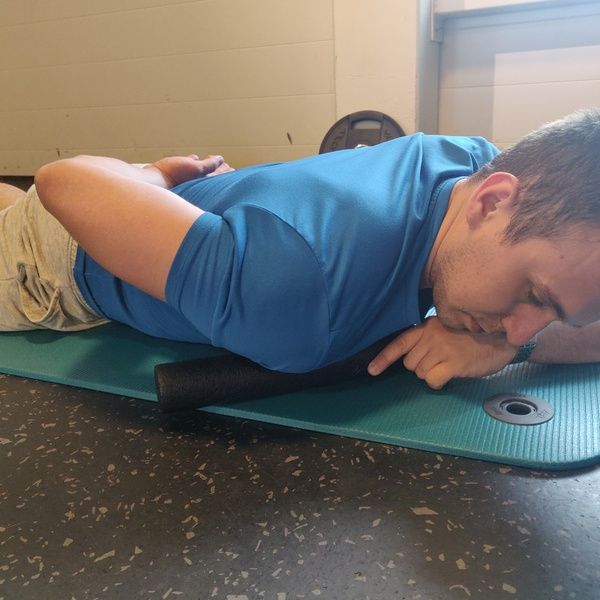
- Lay down on your stomach
- Place your hand on your lower back
- Place the foam roller on your front shoulder and chest muscles
- Press down gently with your body and hold the pressure for 30
Congrats! You’ve completed part one. Let’s move on to the mobility exercises.
2. Mobility Exercises
When you do mobility exercises after foam rolling your muscles, you will move more freely. Here are the mobility exercises:
Cat-Cow Pose
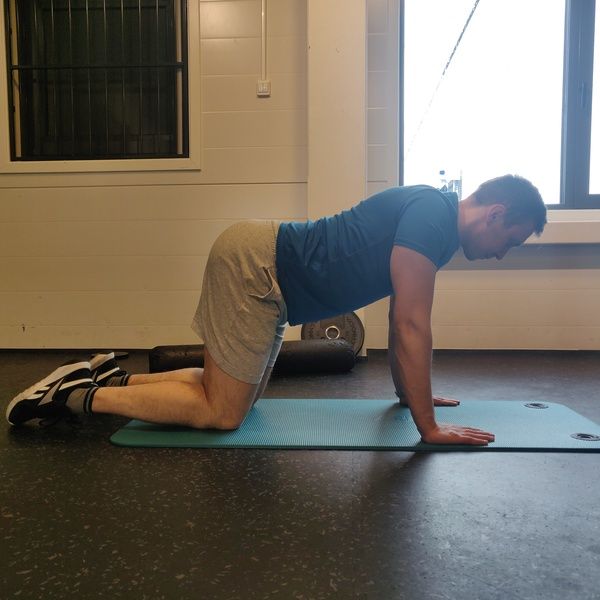
Starting position
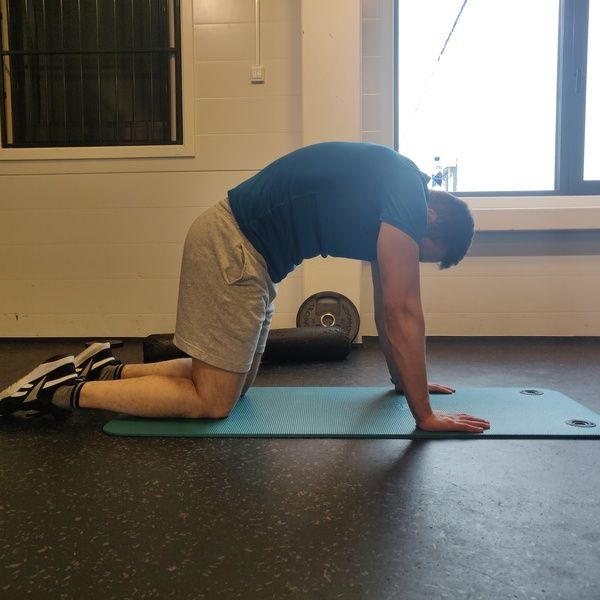
Ending position
- Start with your hands and knees on the floor
- Make sure your spine is in a neutral position
- Press your chest forward and allow your belly to sink down
- Then do the opposite
- Round your spine outward and tuck in your tailbone by drawing your pubic bone forward.
- Repeat for 10 times
Singe Leg Kneeling – Thoracic Extension and Rotation
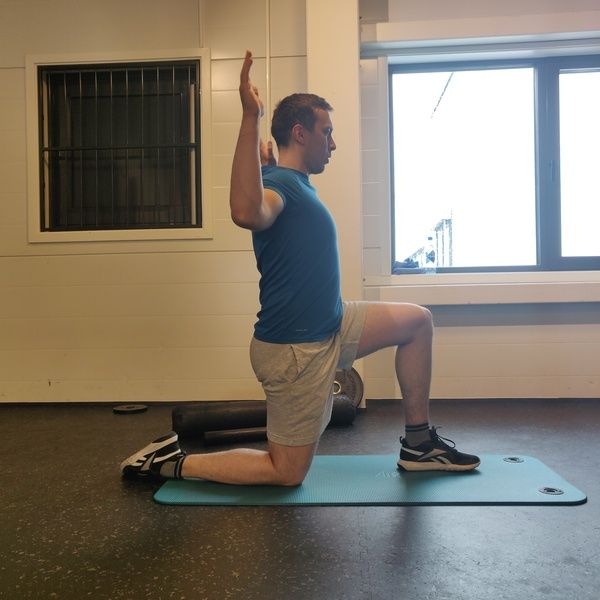
- Start with single leg kneeling stance (See the picture above)
- From that position, lift your arms up while extending your upper back. (See the picture thoracic extension)
- Repeat for 10 times
- Then repeat the same with rotating your upper back (See the picture thoracic rotation)
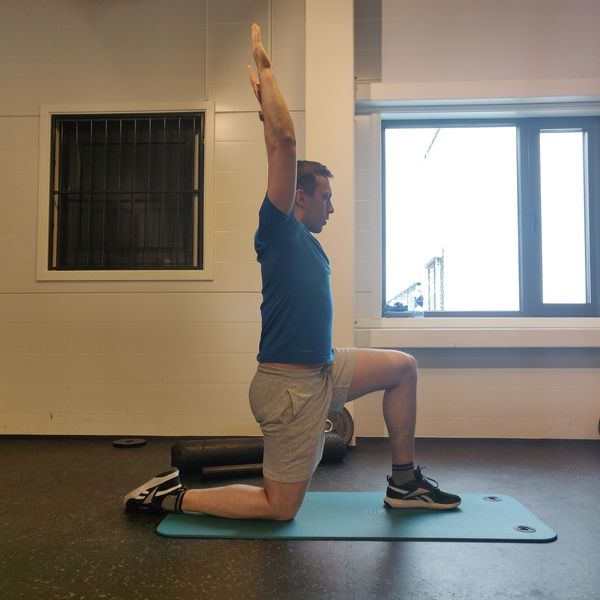
Thoracic extension
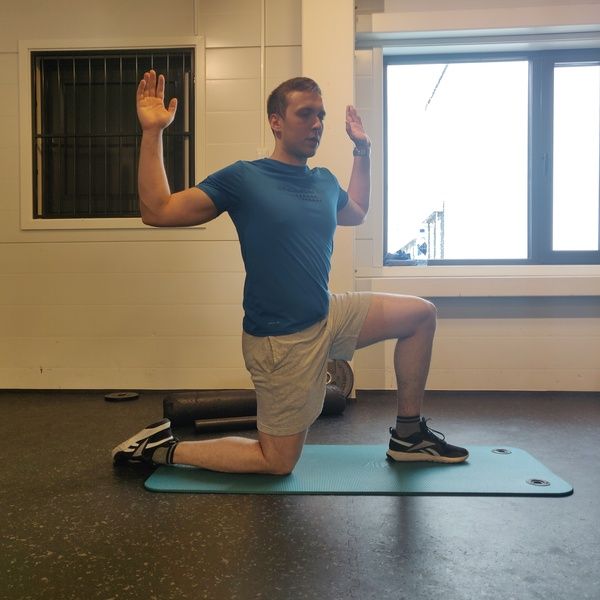
Thoracic rotation
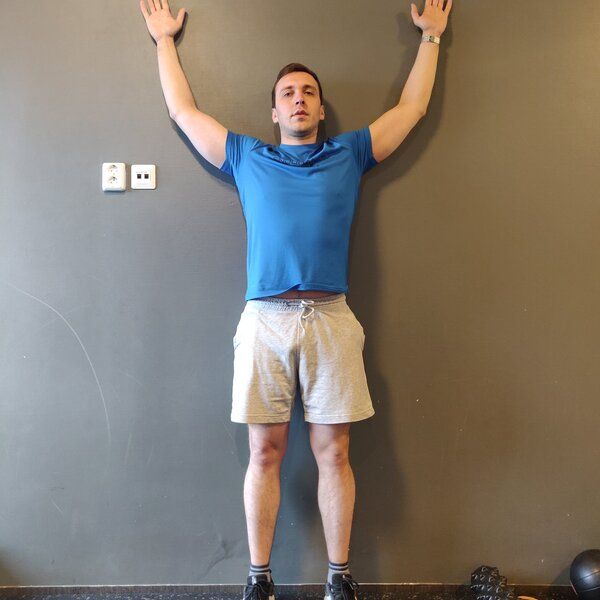
Wall Slides
- Start from standing position with your back against the wall
- Place your arms on the wall with 90/90 position
- Slide with your arms up until your arms are fully extended
- Try to keep your hands and arms against the wall throughout whole movement
- Repeat for 10 times
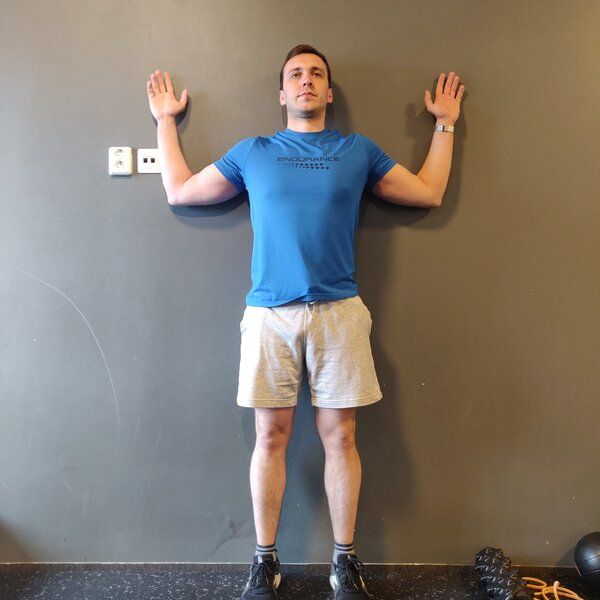
Starting position
Ending position
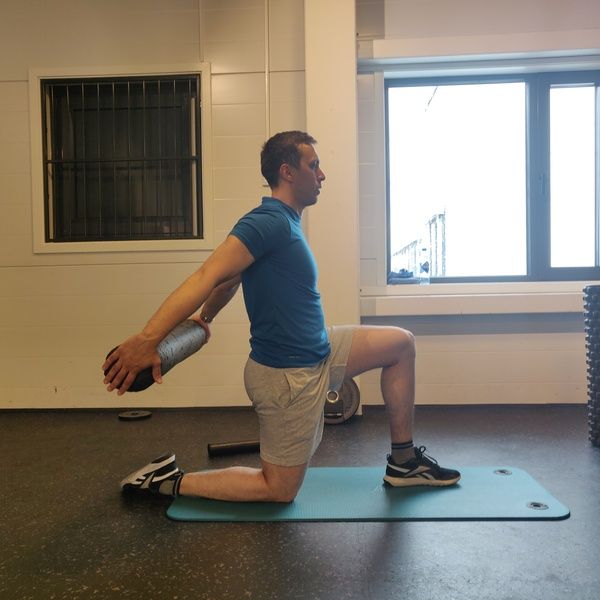
Singe Leg Kneeling – Arm Extension
- Start from one leg kneeling stance
- Grab a foam roller (or towel) and reach with your arms behind your body as much as you can
- Hold your arms straight
- Repeat for 10 times
3. Strengthening Exercises
Prone Arm Lifts
- Lay down on your stomach (also known as prone position)
- Place your arms in one of the following positions: beside your body, shoulder height or above your head
- Lift your arms up and hold for 5s
- Repeat for 10 times
See the pictures below.
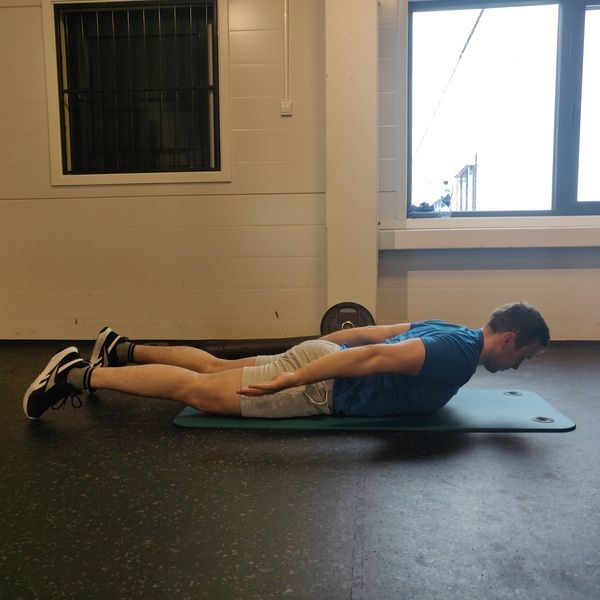
Prone arm lift with arms beside body
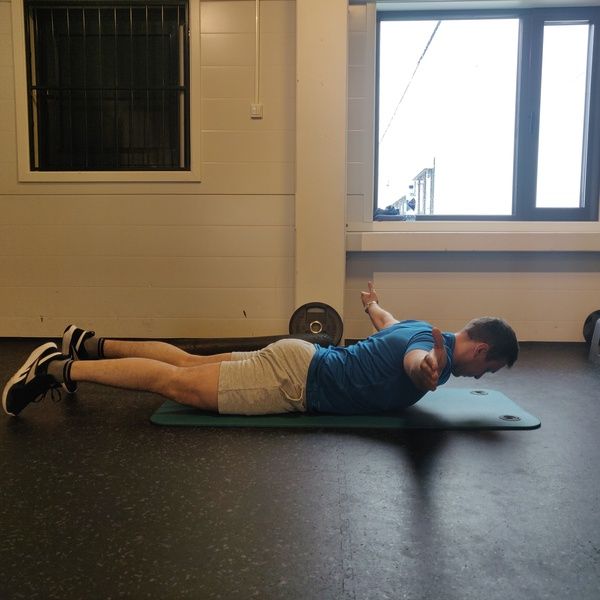
Prone arm lift with arms and shoulder in line
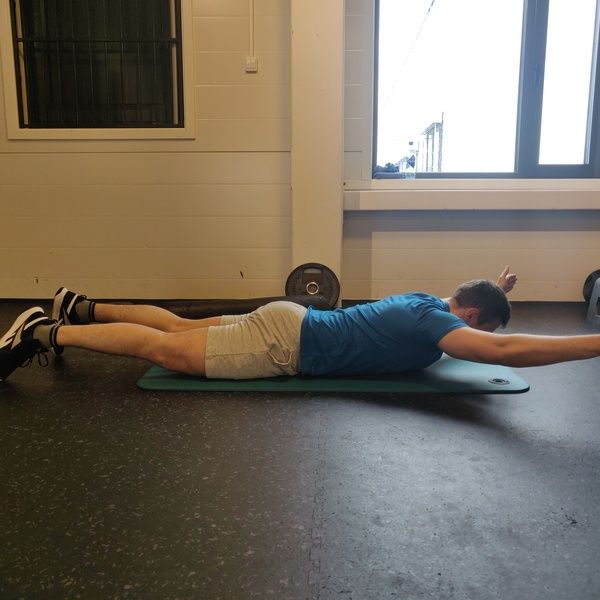
Prone arm lift with arms above body
Standing Press Against the Wall
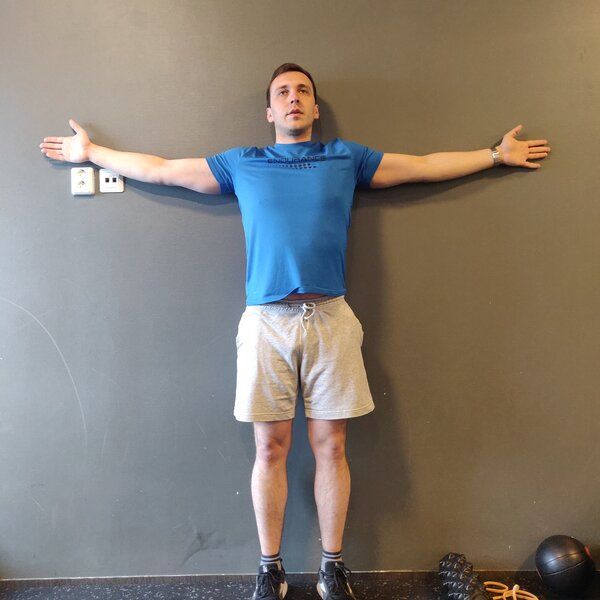
- Start from standing position against the wall
- Place your arms in line with the shoulders
- Hold your arms tight against the wall
- Squeeze your shoulder blades and press wall with your arms
- Hold for 5s and repeat for 10 times
Horizontal Hold With One Arm and Leg Extended
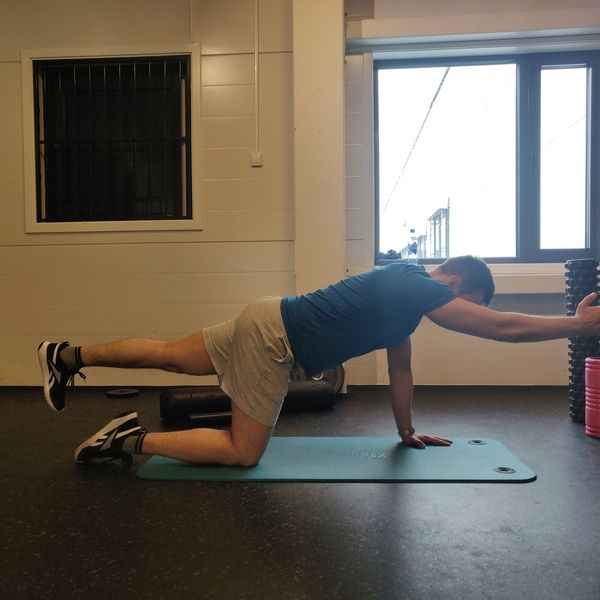
- Place your knees and hands on the ground
- Keep your spine in neutral position
- Raise right arm and left leg up until they reach approximately spine level
- Hold for 30s
- Repeat 3 times
4. Stretching Exercises
Rectus Abdominis Stretching Exercise

- Lay down on your stomach
- Place your hands beside your shoulders
- Push against the floor and lift your upper body up
- Hold for 30
- Repat 3 times
Standing Chest Stretch
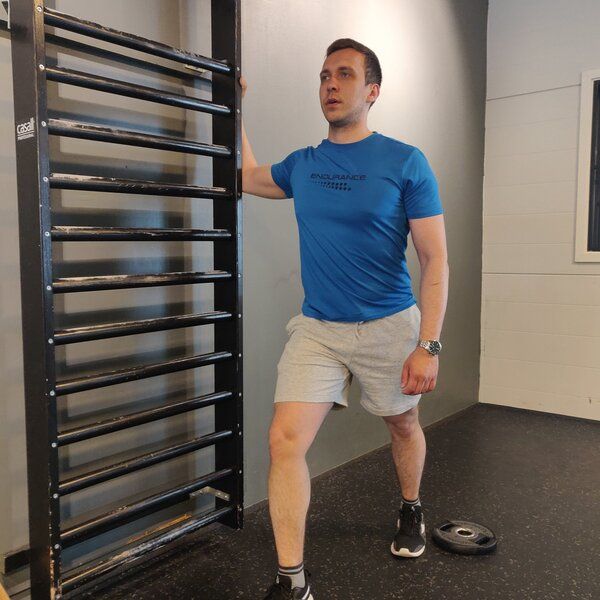
- Start from standing position with one leg in front of the other
- Place one forearm and hand on wall ladder/wall
- Lean on forward with your body until you feel gentle stretch in front shoulder/chest
- Hold for 30s
- Repeat 3 times
Standing Latissimus Stretch with Wall Ladder
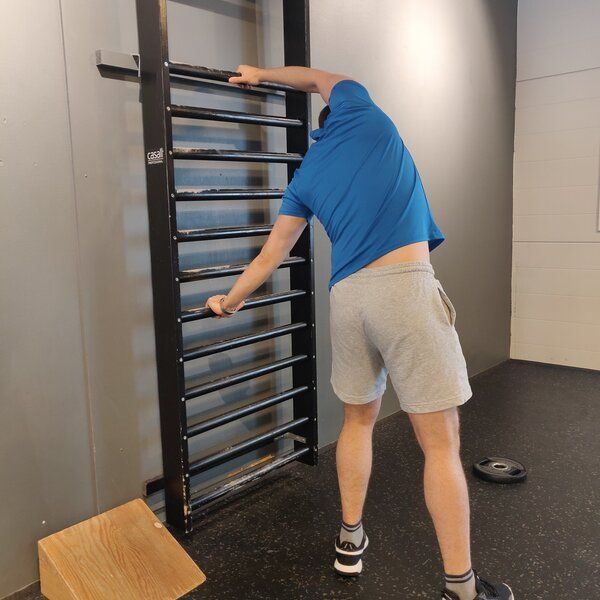
- Stand beside wall ladder
- Place your both hands on wall ladder
- Push your chest forward until you reach gentle stretch in lat area
- Hold for 30s
- Repeat 3 times
Congrats! Now you know/have done exercises you need to fix hunchback posture.
Why Should I Fix Hunchback Posture?
I personally think that everyone should strive to correct posture when there is a deviation from the most optimal position.
The same goes for hunchback posture.
Hunchback posture reduces mobility in the upper body: neck, shoulders and thoracic spine.
That means that any activity which involves raising arms above head, rotating torso or head becomes a bit harder to perform.
Muscles will get tired even from daily activities, which can lead to faster fatigue and muscle pain in the neck muscles, between the shoulder blades and so on.
On the other hand, posture hunchback is important for breathing and lung function.
Since the muscles that actively participate in breathing are actually in thoracic spine region, there is a possibility that they will negatively affect breathing.
They can cause shallow and rapid breathing.
With a straight back, you will look taller than with a hunchbacked posture, simply put. Isn’t that something most people want?
7 Most Common Questions About Hunchback Posture
Can Hunchback be reversed?
Hunchback can be reversed with daily exercising and changes in your daily habits.
How long does it take to fix hunchback posture?
After six weeks you can expect to see some results from your daily exercise routine. Keep in mind that everyone has a different starting point, so it would be wise to take a photo before/after a few weeks of daily exercising.
What is the fastest way to fix a hunchback?
The fastest way to fix a hunchback is to avoid sitting and chest dominant exercises while implementing exercises for upper back and creating posture friendly environment.
Can a chiropractor fix a hunchback?
A chiropractor can help you with diagnosing and treating a hunchback, but don’t expect to fix hunchback posture with one session. You can always ask a chiropractor to show you exercises you can do at home.
Can you fix your posture at 30?
Yes. You can improve your posture at age 30. By improving muscle strength and flexibility, you can positively impact your posture.
Can Massage Help hunchback?
Massage can help you with instant tension relief in your muscles, but you need to do active movement to fix hunchback posture.
Is hunchback genetic?
Hunchback posture is in most cases a result of our daily habits and poor muscle activation. However, sometimes is hunchback posture genetic, and then it’s called congenital kyphosis.
You May Like
- How To Correct Forward Head Posture
- How to Correct Rounded Shoulders
- 10 Stretching Myths Debunked
- Yoga Wheels for Back Flexibility
*Always consult your doctor if you are experiencing pain, especially if pain is persistent and increases with exercising. This article is not meant to replace medical examination and therapy.

