How to Use Foam Rolling for IMPROVING Thoracic Mobility (Extension)
Foam Rolling And Thoracic Mobilization (Step By Step Guide)
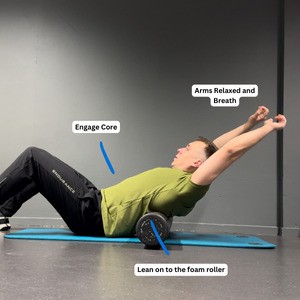
The first step is to lie on your back and place the foam roller under the lower part of your thoracic spine (at rib level).
Make sure not to perform this technique on the lumbar spine.
Take a deep breath, and upon exhaling, activate your core muscles to stabilize the lumbar spine and prevent it from moving during the mobilization of the adjacent segment, the thoracic spine.
Now, the most crucial part. Slowly lean the upper part of your body onto the foam roller, so that the targeted spinal segment glides forward.
Remember, without moving the lower back.
Repeat this movement five times.
After that, move the foam roller slightly upwards and repeat the same technique.
The goal is to mobilize all twelve thoracic vertebrae, which means it will take you a couple of minutes to complete this exercise.
See the picture below.
Expectations from Foam Rolling and Increased ROM
After this technique, you should feel better mobility in the thoracic spine, but there’s a catch.
This effect is temporary, but don’t let that demotivate you. Every time you improve mobility in any part of your body (using foam rolling, stretching, and the like), I recommend continuing training with strength and stability exercises within that newly acquired range of motion.
This way, you’ll teach your body to use muscles actively in the new range of motion, which will eventually lead to accepting the new mobility as the new norm.
I hope you enjoyed reading this text.
See you next time!

